|
Since more faculty will be using Brightspace in the spring 2024 semester, I am sharing a sort of quick start guide below which describes the basics of how to upload your syllabus to your Brightspace class website.
Specifically, these instructions explain how to put your syllabus in a Brightspace module so that each syllabus section is its own page.
Uploading a pdf is so easy! Why separate sections into a module?
It is possible for faculty to upload their entire syllabus as a single Word document or as a pdf and, yes, that is quicker and easier at first. However, uploading it as a module makes it easier for students to access. Here’s why this is preferable:
- More and more students access our Brightspace class websites using mobile devices. Accessing short pages that don’t require extensive scrolling might improve the odds that students will actually read our syllabi. Large blocks of text deter readers, no matter how much of it you put in bold, underlined or different colored text.
- Students who are less-skilled comprehenders tend to read faster and demonstrate lower levels of recall when reading on screen versus in print. This was reiterated in a study published in the International Journal of Human-Computer Studies in August. Chunking content into shorter pages, again, can improve the odds that students not only read but comprehend our syllabi.
- Students find a syllabus module useful so they can view the one section they are looking for or need to review without having to open/download and then scroll through a multi-page document.
- While a syllabus module takes a bit longer when creating your class website, once done you have it for all future sections of that course. Then, semester to semester, I mostly just have to revise and update the schedule of assignments page in that module.
And it makes your life easier when directing students to the specific syllabus page(s) they need to review when you are providing feedback, whether it be your academic integrity policy, requirements for completion of course, grading policy or links to helpful resources.
For example, when posting feedback on drafts in the Discussions area or on final submissions in the Assignments area, I find it so quick and easy to link students directly to the syllabus page they need to review. I write something like, “As noted in the syllabus page Requirements for Completion of Course, each posting is to include at least two quotes from the unit readings” and use the Insert QuickLink menu to direct the students’ attention right to that exact syllabus page in the Content section. Early in the semester, I tend to copy and paste that introductory clause into several student postings but then I notice students get the hint and I don’t have to do it so much after that.
How do I create a syllabus module?
The steps below describe how to set up your syllabus as a module in the Content section of Brightspace rather than upload it all as a single Word file or pdf.
I encourage faculty to consider using the sample JEDI syllabi—which are also linked in MySCCC in the Academics > Faculty section—that have just been updated and that reflect changes in links such as those in the technology article by Johanna Boutcher and Christina Johnston-Eustace in this issue. These JEDI syllabi reflect the latest research in how to make our syllabi more inclusive and student friendly.
- Use the Suffolk Login Portal to access Brightspace. From the SCCC home page, click the Login link and complete the multi-factor authentication to log in.
- Click the Brightspace tile in the Suffolk Login Portal.
- On the SCCC Brightspace landing page, click the waffle menu (looks like nine small squares) at the top of the page, then click the course you want to edit.
-
From your course home page, click Content.
- In the Content section, on the left side of the screen under Table of Contents, click Add a module, type Syllabus and hit Enter.
Now that you have created a module, let’s add your syllabus section by section. I find it easiest to have a copy of my syllabus in Word open so I can move between windows as I copy and paste from Word to Brightspace.
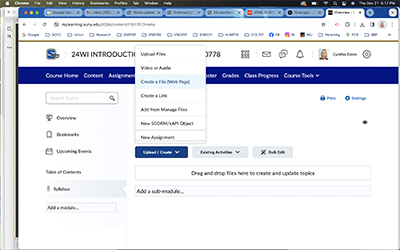
- In your newly created syllabus module, you’ll see Syllabus written toward the top of your screen; below that, click the blue button that says Upload/Create, then select Create a File (Web Page).
- Next, you will see a screen that says "Create a File (Web Page) in Syllabus" at the top. In the subject line, type the name of the page you wish to add first, e.g., Course Description/Student Learning Outcomes. This is the name of the link that students click.
- Below the page name, paste your basic course information—full course name, description and student learning outcomes—in the larger box provided, as shown in the official college catalog for this class.
- Once your page title and content are added, click Save and Close.
- Repeat steps 1-4 for each of the pages you need to add as you go section by section through your syllabus until your module is complete. If you're using the JEDI syllabi, you would create a file/webpage for each of the dark blue section headings.
Hope this helps! Let me know if you have questions or, when you feel ready to expand your use of Brightspace, check your email for the workshops offered each semester by the Center for Teaching and Learning. |